
Bike riders often need to remove the cranks from their bikes for cleaning and maintenance. Maybe the puller is lost or broken, or trying to save some money. However, many people do not know how to remove a bike crank without puller. ?
In this blog post, we will show you how to do this without a crank puller. Keep reading for more details.

Can I remove the crank arm without puller ?
Yes, you can. However, the best way to remove a crank arm is using a crank puller tool. A crankshaft puller should be used whenever possible for the front and rear wheels of the bike since they are easily accessible during servicing or repair work.
The reason why professionals prefer this one-time use tool over simply removing the bolts is because the bottom bracket (BB) threads become damaged by disassembly with normal wrenches and screwdrivers.
But there is an uncommon situation when it will be impossible to find a crank puller but not necessary to pay the high cost of purchasing one. In such unusual circumstances, you may also be able to simply remove the crank arms off your bike without any special tools and equipment needed.
Why Remove Cranks In First Place?
For your information, cranks are the arms on which you pedal on. Usually, people usually remove cranks or change crank arms when they are attempting to form a new bike shape or change the handlebars.
If you want to remove the entire cranks on your bicycle, then it is necessary for you to use special tools such as a crank puller. Other reasons you remove cranks are:
a) For transportation of bicycles. This means that those bicycles with quick release hubs must have their wheels and cranks removed so they can be put into a vehicle more conveniently and quickly than with the front wheel still attached.
You also need not take off your pedal when removing your cycle from the workstand.
b) Changing gears on some modern multi-speed bikes is simplified by removing one or more of the chainwheels (or cogs) from its axle (or cog carrier). This means that to change gears, you need only loosen the axle nuts or quick release lever and remove the old cog.
Change the new one designed for your present speed range onto the spindle, then re-tighten and adjust them on both sides of your hub gear. As such, this is another good reason why you must remove cranks from bikes.
What tools do I need to remove a bike crank? :
- Old rags to dust off the dirt
- Alley Keys
- Spindle driver
- Crank nuts and bolts for your bike
- Bike Stand
Simple steps How to remove bike crank without puller
Step 1:Use Gloves to Protect your hands
You will need gloves during the removal process since it may be not comfortable when touching metal parts with bare hand while also rotating the crank arm fast and hard at a clockwise direction (turning counterclockwise). Thus, we recommend you wear gloves while taking off your crank arms.
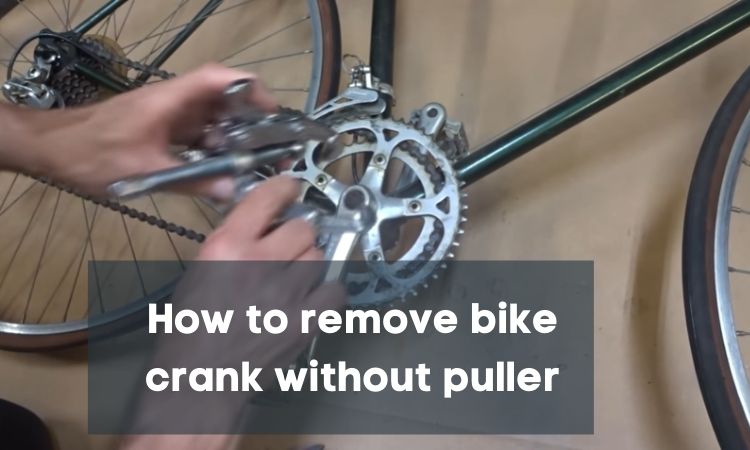
Step 2: Remove the Bike Crank Nuts or Bolts
To remove your crank, you must first remove its bolts or nuts. There will be either one or two bolts depending on how many crank arms (arms) exist on your bicycle.
Whether you have single arm or double arm, there will some kind of nut or bolt holding it to the bottom bracket spindle as shown in the photo below.
Step 3: Remove all Washers
In most cases, some washers are used as a space between the bottom bracket and the crankset. It is just like preload spacers or shims that are used in suspension systems. Remove all washers underneath the crank arm, and keep them in a safe place just in case they come off when you service your bicycle later on. Step
Step 4: Threading the Puller’s Spindle Driver
In order to get the crank arm out, you need a special tool called a crank puller. While removing the bolt of each side of your crankset, you need to insert its spindle driver into one of them.
You may have considered using adjustable wrench or vise grip pliers from this step but it is not recommended since these tools will make damage on the threads which leads to more difficult removal in future service works for some reason.
Therefore, use a general-purpose crank puller instead which is more safe and suitable for your bicycle parts.
Step 5: Set a Clockwise Direction to the Driver Spindle
Next, set a clockwise direction when inserting the driver spindle inside one of the nuts which you have already removed from the bottom bracket.
The driver spindle needs to be rotated in a clockwise direction when facing at your crank arm as shown below.
Step 6: Remove the Crank arm puller tool
Once threading it into one of the crankset nuts, you can now remove all bolts or nuts underneath it and keep them in a safe place just in case when they come off when you service your bicycle later on.
After that, continue rotating the spindle driver with a counterclockwise direction so that the nut gets left at its threads inside for easy re-tightening next time.
In doing this, just take out the crankset puller carefully without any damages done on its threads. This is where the easy part ends so you should be very careful at this step.
Step 7: Repeating the process on the Other crank
Finally, repeat all above steps to unscrew another crankset nut or bolt on your other side if you have double arms or two cranksets.
The same techniques are applied for removing both of them without any problem. Once completed, remove all washers carefully if there are any underneath your crankset before re-tightening your bottom bracket again.
Step 8: Do a Final Bike test
After completing all these steps, do a final bike test by checking every parts working properly before putting everything back to its original positions including pedals, tires and front.
Putting them together can be very confusing, but make sure they are aligned properly to avoid any injury while riding on the road.
Step 9: Do a Final Bike test
How do you remove a square taper crank arm without a tool?
Square taper bottom bracket installation and removal is relatively easy if having the right parts including a crank puller tool for its installation and removal process.
Since there are no nuts or bolts involved in installing and removing square taper crankset, you just need to place the spindle driver inside its square hole and take it out once rotates in a clockwise direction.
However, if there is no crank arm removal tool involved then you may try using adjustable wrench or visegrip pliers which can damage your bicycle parts instead of helping you .
How do you remove a Shimano crank without a tool?
If you have a Shimano crankset, then you need to remove two external bolts (per side) and then simply pull the crank arm off. When replacing, just screw the new arm on and tighten the bolts.
How to remove a Self Extracting Bike Crank
To do this, firstly you must place your bike upside down on a stand or hold it at its seat tube with one hand and use another hand for holding the drive-side crank arm.
Then, tap the end of the spindle (driver) several times with the rubber part of the Dura-Ace extractor until it slides out of its housing.
After that, leave two nuts on each side of the bottom bracket like in step 2 before doing any removal works for your crankset.
Now comes to the final step, place the Dura-Ace puller into a clockwise rotation and then push it inwards slowly until its inserted long spindle goes all the way inside to remove your crank arm safely.
Conclusion:
You can easily remove your crank arm without any special tools and skills. Just be careful when working with the crank arm extractor and follow these steps carefully to avoid any problem at all.
Your feedback is always welcomed. Thanks for reading this article, like it or share it if you think that can help others who also need this kind of help in removing their bike crank without puller.